In this small series, I want to introduce the most common Active Directory PowerShell cmdlets to you like New-ADUser.
With the cmdlet New-ADUser you can:
– Create new users,
– Add passwords or
– Bulk create users with a csv-file
![]()
AD PowerShell Basics
I created the series AD PowerShell Basics to show you how to use basic PowerShell commands – and how to get a lot of information from or to Active Directory with only a little effort and a small script. The following Cmdlets will be introduced:
New-ADUser
Get-ADUser
Set-ADUser
New-ADGroup, Get-ADGroup, Set-ADGroup
![]()
The New-ADUser Cmdlet
Index
In this first article I want to explain what you can do with the cmdlet New-ADUser. In general, the cmdlet is used to create new user objects in Active Directory. To use the command, it is mandatory to know the sAMAccountName of the user that shall be created. And this could look like that:
|
1 |
New-ADUser -Name Mike.Miller |
If you run this line in a PowerShell the user with the sAMAccountname and the cn (common name) “Mike.Miller” will be created. Make sure you have installed the AD tools.
There is only this information (sAMAcountname, cn) set to the account:
- No FirstName or LastName,
- No attributes filled
- No password set
- User is created as “disabled” user
And the user account will be created in the “Standard” user container. But in most cases we do not want it to stay there.
Add First Name, Last Name and Target OU
It makes sense to add some more information. As explained before this is not mandatory, but if you really want to work with the user object in Active Directory it is somehow essential. You can add for example the following parameters:
|
1 |
New-ADUser -Name Mike.Miller -GivenName Mike -Surname Miller -Path "OU=Testuser,DC=Company,DC=Com" |
With this line you can set the First Name, Last Name and the OU of the user account. And you can set almost all other attributes to specify a user in this way. There are just a few exceptions.
Add Password
User creation with New-ADUser gets a little bit more difficult, when it comes to adding a password. But setting a password has multiple benefits:
- You do not need to change the account again.
Setting a password during the creation process safes you a lot of time.
- The account will be created as “enabled”, If you create it with a password,
Because only the respective user should know his own password, you should also make him change it after the first login.
Change Password at First Login
Unfortunately, New-ADUser does not allow you to set a value like “Start12345” for the parameter –AccountPassword. You have to set it as a Secure String in this case.
There is an You can easily workaround it. Define a variable with the “password value” and transform it into a Secure String. This might look like this:
|
1 2 |
$password = "Start12345" | ConvertTo-SecureString -AsPlainText -Force New-ADUser -Name Mike.Miller -GivenName Mike -Surname Miller -Path "OU=Testuser,DC=Company,DC=Com" -AccountPassword $Password -ChangePasswordAtLogon $True -Enabled $True |
Nun haben Sie einen Account, der vom Benutzer direkt verwendet werden kann.
Dabei ist sichergestellt, dass er das Kennwort beim ersten Login neu vergeben muss.
Now you have an account that can be used directly by the user. And it is ensured that he has set a new password on first login.
Bulk Import Users with New-ADUser
So far so good. If you compare what we did with the creation of a user in the Active Directory Users and Computers console, PowerShell doesn’t seem that handy.
BUT, PowerShell and New-ADUser really get powerful, when it comes to the creation of several hundred user accounts at once. You just need one input file with all the necessary information.
I suggest a semicolon separated CSV file, as this is the European standard .
US should probably use comma separated CVS to avoid weird behavior of Excel when you open it again.
Create an Excel spreadsheet with columns for Name, FirstName, LastName and so on and save it to the CSV file format.
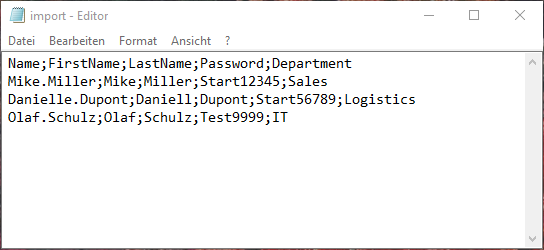
The CSV file for user bulk import could be looking like that:
In this example I also added the department where the users are employes. And I did not take care about the OU this time, because I want them all to be in the same OU. The OU “Testuser” will be set in the beginning. Of course you can add an OU for each user as well, for example if you have a separate OUs for each department.
Now you just need to add some more code to the lines we just wrote before and it will run the user creation for each line of your CSV file:
|
1 2 3 4 5 6 7 8 9 10 11 |
$Import =Import-CSV "c:\Test\import.csv" $OU = "OU=Testuser,DC=Company,DC=Com" Foreach ($user in $Import) { $password = $user.Password | ConvertTo-SecureString -AsPlainText -Force New-ADUser -Name $user.Name -GivenName $user.FirstName -Surname $user.LastName -Path $OU -AccountPassword $Password -ChangePasswordAtLogon $True -Enabled $True } |
What does the script do?
- It imports the CSV file.
- Sets the standard OU
- Calls each data record (line of your CSV), writes the password and creates the user account
We are using a “Foreach”-loop, which loads each user record with its parameters from the CSV file.
Conclusion
Creating users with the PowerShell cmdlet New-ADUser is very efficient and time saving, when it comes to the (recurring) creation of many users at the same time.
We would be happy to support you – Contact us if you would like to know more.


2 Comments
Leave your reply.